Friday, 11 October 2013

Distillery District Christmas Market

One of the great things about living in the GTA has to be all the fun and neat things to do and see all year round. Although the idea of hibernating during the cold winter months is tempting, there are so many fun activities, festivals and events which will have you out of the house and breathing that fresh Canadian air.

This weekend we went exploring the historic Distillery District.  It was once the site of Gooderham and Worts Distillery which began operations in the mid-1800s and closed in the early 1990s. Presently, many of the Victorian buildings have been beautifully restored and now house trendy galleries, cafes, restaurants, jewelry shops and even a preforming arts theatre. During the month of December, the Distillery District transforms into a romantic European Christmas market where one can enjoy mulled wine, hot apple cider and indulge in many tasty treats.


What makes this market so fun and unique is it really sums up Toronto for me--a mix of the old and new--embracing different cultures and making it a part of our own. Here you find a combination of traditional Christmas staples like live Christmas carolers, beautifully decorated trees, European food staples and contemporary art pushing your minds boundries and introducing you to new ways to see the world.


Wednesday, 5 December 2012

Celebrate the Holidays a lo Salvadoreño!

Pavito Salvadoreño!

Tired of the same-old dry, flavourless turkey? Why not change it up this year and try this delicious Salvadoran turkey, packed with lots of flavour and sure to be a holiday hit!

As a little girl, my favorite time of the year was without question Christmas. However, not for the obvious reasons of presents and vacation, but rather because of the delicious food! I knew that my mom was going to make one of my favourite dishes in the world...Pavito! I remember waking up to the tantalizing aroma of turkey in the oven and the sounds of my mom chopping veggies to make escabeche! These delicious aromas were almost too much for me and I would quickly find myself with a watering mouth. Now with these delicious memories in mind, I always wondered why so many of my friends complained that "turkey sucked" and that Thanksgiving was an excuse to eat flavourless food. It was only until I was a lot older and I actually tried several different "turkey" dishes that I finally understood the disappointment. These turkeys were just popped in the oven and left to cook, the results were less than stellar--dry, bland and unimpressive without the gravy. After thanking my lucky stars that I didn't have to eat that on special occasions I decided it is time I share my family's yummy recipe. Below is my mother's famous pavito which is sure to be a hit this holiday season.
Pavito Salvadoreño Recipe

What you will need for the overnight marinade:
  • 1 turkey (we always use fresh, but if it's frozen make sure its thawed out before you start)
  • 1/2 cup of mustard
  • 2/3 of a cup of margarine
  • 2 packages of Sazon Goya (there are different flavours of this to choose from, select either the "Con Cilantro y Tomate" or the "Con Culantro y Achiote") 
  • 8-11 cloves of crushed garlic
  • 1 or 2 bottles of beer....yes, beer!! (2 bottles if you have over a 17 pound bird)
  • 1/2 cup of minced onion 
  • 4 dashes of Worcestershire sauce (optional)
  • salt and pepper to taste
In a bowl, combine the margarine, mustard, crushed garlic cloves, onion and 2 packages of Sazon Goya. Add salt and pepper to taste, about 1/2 tsp of each I find works well. Once you have the mixture well mixed, with clean hands apply the mixture to the raw turkey. Make sure to get the mixture under the skin of the turkey as well, this step ensures the turkey is well marinated. Pour the bottle/s of beer over and inside the turkey =) Cover your turkey and place in the refrigerator over night. 

Overnight marinade - mustard, margarine, onions, garlic, sazon goya, worcestershire sauce, salt and pepper
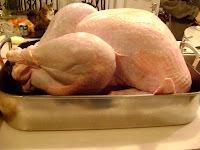
Fresh Turkey
Turkey covered in overnight marinade mixture


Turkey Day!
  • a can of crushed or whole tomatoes
  • a bag of toasted "Relajo"
    • "Relajo" can be found at speciality Latin American food stores. If you are unable to find these stores, relajo can be made at home by toasting:
      • 1/3 of a cup of sesame seeds
      • 1/3 of a cup of roasted pumpkin seeds - these may be labelled as "pepitas"
      • 6-10 bay leaves
      • 1 dried chile guaque
  • 2 red bell peppers
  • 2 green bell peppers
  • 2 large onions
Optional:
  • one bottle of pitted green olives (I am not an olive fan, so I omit this step)
    • once the turkey is fully cooked add 2/3 of the bottle to the gravy at the bottom of the turkey.
Preheat your oven to 350 degrees Celsius.

In a small dry pan (no oil) add the relajo mixture over medium heat. Lightly toast the mixture, depending on your range this can take one minute or five minutes. Nothing should look or smell burnt. Remove the spices from the pan and save for use later.

In a blender, combine the can of whole/crushed tomatoes, roughly chopped bell peppers (both green and red) and roughly chopped onions. Add your toasted spices into the blender. Blend until the mixture is no longer chunky and is a smooth consistency.

Take your turkey out of the fridge and pop in the oven. For a 20 pound turkey keep in the oven for about 2 hours until lightly golden. After about 2 hours, pour your tomato mixture on top on the turkey. Cover turkey in aluminium foil. Place turkey in oven, every 30 mins or so, ladle tomato gravy over the turkey, don't forget to cover it with foil again.

Depending on the size of your turkey that will determine how long you must keep it in the oven. Once it is done pour the delicious sauce into gravy bowls and enjoy this delicious bird!


Delicious Taste of Summer: Guacamole!

Quick and Easy Guacamole!

Have a few ripe avocados lying around and you don't know what to do with them? Why not make this delicious guacamole that you can pair with tortilla chips, toasted bread or even as a side for barbecue!

What you will need:
  • 3-4 ripe avocados
    • You know they are ripe when their skins are dark/black and they feel firm but not hard. They should not feel squishy, those are over ripe avocados.
  • 1/2 a cup of chopped cilantro (also known as coriander)
  • 1/3 of a cup of very finely minced white onion, it should look almost slushy
  • 2-3 limes (depending on juiciness)
  • salt to taste
Cut the avocados in half --> Cut the avocado lengthwise with your knife, but do NOT go through the seed....that would be almost impossible. Once you have run your knife 360 degrees around the seed, with your hands twist the avocado. You will now have the one half of the avocado with the seed and the other without. To remove the pit, CAREFULLY tap a sharp knife into the pit so your knife becomes lodged into the pit. Twist your knife and the pit will easily come out. If you are a little weary of trying this method, merely scoop out the pit with a spoon...much safer :)

Make little cubes of avocado by making slots into the avocado first horizontally and then vertically. Scoop out the avocado with a spoon and into a bowl.

Add the chopped cilantro and onion into the bowl with the avocado. Squeeze some lime juice and add some salt. Combine mixture well. Taste the guacamole and add salt if it needs it or lime juice if it needs it.

Tip of the day: Put one or several of the avocado pits back into your guacamole to prevent the guacamole from browning!

You are done! Enjoy this yummy treat =)

A Little Taste of Winter: Osso Bucco


Looking to impress a significant other with your fine culinary cuisine? Why not try this delicious Osso Bucco! It is perfect for those cold winter days when all you want to do is stay at home and watch holiday movies all day long.

I was first introduced to this scrumptious dish by my boyfriend, the foodie of all foodies, who wanted to prove he could also cook delicious food and not just eat it! :P After one bite I was counting my lucky stars for having a great guy who not only enjoyed food but could actually make it too!

Here is what you will need:
  • 4-5 beef or veal shanks (veal shanks take less time to cook and are more tender)
  • 2 tablespoons of tomato paste
  • 4 cups of chicken or beef stock (whatever you have on hand)
  • 2 medium sized onions diced
  • 3 large carrots diced
  • 4 stalks of celery
  • 2 bay leaves
  • 2 tablespoons of Italian seasoning
  • salt and pepper
  • 2/3 cup of flour
Step 1:

Liberally salt and pepper each side of each shank. On a plate, spread the 2/3 of flour and lightly coat both sides of each shank. Tap off excess flour.  In a hot skillet/pot add 2 tablespoons of oil.  Once the oil is almost smoking add each shank and brown both sides of the shanks. They will not be cooked by any means, the point is just to get the sides brown. Brown = flavour later on ;) Remove from skillet and put the shanks aside for the time being.

Step 2:

In the same skillet/pot where you have all your brown bits, lower your burner to medium heat and add the diced carrots, onions and celery. Salt your vegetables. You want them in there long enough for the onions to turn translucent and the carrots and celery to soften. Once this has occurred, about 8-10 mins, add 2 tablespoons of tomato paste and stir. Add 2 cups of stock and reduce it by half. Put your shanks back into the pot and add another cup of stock so that they shanks are almost fully covered by stock or at least three-quarters of the way submerged. Add 2 tablespoons of Italian seasoning. Reduce the heat to low and put the lid on the pot. Every 15-20 minutes flips your shanks over (this is not necessary but I like to make sure even heat distribution).

Step 3:

After about 3 hours of cooking, you should be left with fall off the bone deliciousness =) Take your shanks out and reduce the sauce even further on medium heat for a thick rich sauce. Douse the shanks with this reduced sauce and serve with warm bread or on a bed of rice.

Enjoy!


Wednesday, 30 November 2011

Sopa de Cangrejo con Camarones

Today was the first snowfall of the year, and I had mixed feelings about it. On the one hand it means we are that much closer to my favorite time of the year...Christmas! On the other hand, it also means scraping snow and ice off the car and winter driving. So to cheer me up my mom and I decided to make one of my favorite dishes in the world. "Sopa de Cangrejo con Camarones" not only brings back wonderful childhood memories but this dish is a seafood lover's dream. 

To start you will need 5 crabs or more depending on how many people will be eating. I suggest one crab per person.  Make sure to scrub the crabs very well with a toothbrush because they tend to have a bit of sand stuck in between their crevasses. 


The next step is to defrost and devein the shrimp.

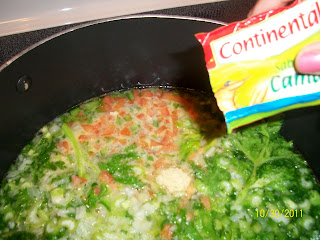
In a separate bowl dice 3 stalks of celery, 1 bell pepper (any color), 1 plum tomato, a handful of parsley, and 1 onion. You will also need 5-6 garlic cloves or more depending on the size of the cloves. You will need a tablespoon of salt. You will also need 2 bags of shrimp seasoning (sabrosador de camarón)...this is very important and worth finding. You can find them in Latin American food shops, as well as in the international food aisle at most grocery stores. The specific brand I used is Continental and adds that authentic Salvadoran flavor. 

 Once you have all the vegetables finely chopped add them to a pot of boiling water. Make sure that you only have about half the pot full of water, the other half is needed for the crabs and shrimps. 

 At this point in time add the 2 bags of shrimp seasoning and salt. Stir.
 While the vegetables are in the water take a sharp knife and crack the crabs down the middle. Make sure not to cut all the way through as you want the crabs to stay whole. This step really helps once its time to eat the crabs as its easier to get to the good stuff. 
 Add your crabs and shrimps into the soup. You will notice that the shrimps and the crabs immediately start turning pink. From this point, the soup will be ready to eat in about 10 mins 
 Add two bags of Sazón Goya -- this adds a little more seasoning and color. Stir the soup. 
 One of the best things about this soup is the little bits of poached eggs! Right after you have added the Sazón Goya seasoning crack 5 eggs into the soup. If you are worried about getting shells into the soup, crack the eggs into a bowl and break the yolks with a fork and then add it to the soup. 

 Crack the eggs and then use the wooden spoon to break the yolks. 
 The soup is ready! Remember to always check for seasoning throughout the cooking process. If you feel that its missing some salt or more shrimp seasoning, now is the time to add more. 

 Now, while the soup is cooling a little it's the perfect opportunity to make tortillas! No Salvadoran soup is complete without a side of hot tortillas. I like to use the Maseca corn tortilla mix. All you do is add water and you have your dough! Once you have the dough forming one giant ball start forming small tennis balls. Put a plastic bag on your counter and place your small tennis balls on the right side of the bag. Take the left side of the bag and fold it over the ball. It is comparable to making a book cover and your ball represents the pages inside the book. 
Then take a cutting board, plastic/wood, and press the board down. 

 Remove the board and once you lift the plastic bag you will have your round tortilla. 
Place your raw tortilla on a hot pan or on a pancake griddle. Flip after about 2 minutes and wait about another 2 minutes for the other side to cook. 

 Buen Provecho!!! =) 

Thursday, 29 September 2011

Jaime Oliver's Red Thai Curry

This month I have become absolutely obsessed with a new show on the Food Network, it is Jaime Oliver's Meals in Minutes. Throughout the years I have watched Jaime move from one show to the next, trying to inspire regular people to stop eating pre-packaged foods/take-out and opt for a healthy homemade alternative. Despite his efforts, convincing the regular joe to cook for 2 hours to put dinner on the table was not going to happen, at least not every night. His new show however promises to put a full-course tasty AND healthy meal on the table in 30 minutes. Watching him create mouthwatering dishes from appetizer to dessert inspired me to put one of his recipes to the test. Being a huge fan of Thai curries I was pumped to try his Red Thai Curry.


Despite being a huge fan of Thai cuisine I most definitely did not have the majority of the ingredients sitting in my pantry. Therefore I headed over to the local Asian grocery store to pick up ingredients such as kaffir lime leaves and lemon grass. All in all everything on the ingredient list cost about $30, which included 3 bags of shrimps :)  With all my ingredients in hand, I took Jamie's advice and laid everything out I was going to need. I plugged in the food processor, preheated the oven and had my pans at the ready. I looked at the clock and began cooking. I will admit I cheated. I not only used a rice cooker to make my fluffy rice but I also had no intention of making the papaya platter as I do not like papaya.  I also could not be bothered to make the cucumber salad. So did I think that I was going to have everything done in 30 minutes, absolutely.


I had the rice washed and cooking in 2 minutes and felt quite confident that I would be enjoying my Thai curry shortly.  I chucked the coriander, tomato paste, ginger, red pepper ( I forgot to purchase the roasted red peppers in oil), garlic, lime leaves and chili in the food processor. Jaime encourages viewers to taste the chili to determine the intensity of heat. Thank goodness I tried it. My one inch chili packed a punch, therefore I decided one was more than enough. Having never worked with lemon grass I was a little taken aback of its woody-bamboo like texture, but threw it in away.


I locked the food-processor lid in place and turned it on. Unfortunately for me, my food processor did not produce the miracle paste that Jamie's food processor produced.  Instead it made a horrible sound and the smell of metal began emanating from the machine. I tried to see what the problem was and wasted 20 mins trying to get it to blitz. I then got the bright idea to use my hand-held blender....another disaster. Then, realizing that it was too late to chop everything up manually as they were covered in each other's juices, I took out my cheese and meat grinder and thought that would do the trick. It grated the ginger and then everything else got stuck. So I started manually chopping. After making what looked more like a salsa than a paste, I added the olive oil, sesame oil and soy sauce. I  tried the concoction and was pleasantly surprised with how the flavours popped in my mouth.


After the food processor and the blender
I started by adding some of the paste to the raw shrimp and popped them in the oven, then placed the remainder of the paste in a pot and followed Jaime's instructions. Everything after the paste ordeal was coming together in a matter of minutes.  I pulled the shrimps out of the oven and got a bowl of rice and added the curry and shrimps to it. It was delicious. Granted the sauce was a little thinner than my personal preference but the flavour was definitely there. I will be making this recipe again and next time I either chop the paste manually the first time around or I get a new food processor.


Stress level: 3/5 (The food processor issue really threw me for a loop but after that was resolved, it was smooth sailing)

Tastiness: 3.5/5 (It was still lacking compared to the Thai Lamb Curry at the Bangkok Spoon)

Cooking Time: 45 mins (Granted without machine issues it could have been accomplished in 15-20 mins)

Overall rating: 4/5 (Definitely worth repeating)