Wednesday, 30 November 2011

Sopa de Cangrejo con Camarones

Today was the first snowfall of the year, and I had mixed feelings about it. On the one hand it means we are that much closer to my favorite time of the year...Christmas! On the other hand, it also means scraping snow and ice off the car and winter driving. So to cheer me up my mom and I decided to make one of my favorite dishes in the world. "Sopa de Cangrejo con Camarones" not only brings back wonderful childhood memories but this dish is a seafood lover's dream. 

To start you will need 5 crabs or more depending on how many people will be eating. I suggest one crab per person.  Make sure to scrub the crabs very well with a toothbrush because they tend to have a bit of sand stuck in between their crevasses. 


The next step is to defrost and devein the shrimp.

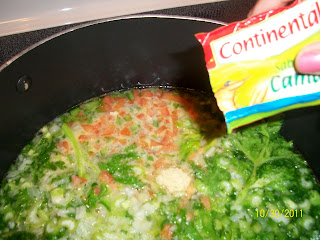
In a separate bowl dice 3 stalks of celery, 1 bell pepper (any color), 1 plum tomato, a handful of parsley, and 1 onion. You will also need 5-6 garlic cloves or more depending on the size of the cloves. You will need a tablespoon of salt. You will also need 2 bags of shrimp seasoning (sabrosador de camarón)...this is very important and worth finding. You can find them in Latin American food shops, as well as in the international food aisle at most grocery stores. The specific brand I used is Continental and adds that authentic Salvadoran flavor. 

 Once you have all the vegetables finely chopped add them to a pot of boiling water. Make sure that you only have about half the pot full of water, the other half is needed for the crabs and shrimps. 

 At this point in time add the 2 bags of shrimp seasoning and salt. Stir.
 While the vegetables are in the water take a sharp knife and crack the crabs down the middle. Make sure not to cut all the way through as you want the crabs to stay whole. This step really helps once its time to eat the crabs as its easier to get to the good stuff. 
 Add your crabs and shrimps into the soup. You will notice that the shrimps and the crabs immediately start turning pink. From this point, the soup will be ready to eat in about 10 mins 
 Add two bags of Sazón Goya -- this adds a little more seasoning and color. Stir the soup. 
 One of the best things about this soup is the little bits of poached eggs! Right after you have added the Sazón Goya seasoning crack 5 eggs into the soup. If you are worried about getting shells into the soup, crack the eggs into a bowl and break the yolks with a fork and then add it to the soup. 

 Crack the eggs and then use the wooden spoon to break the yolks. 
 The soup is ready! Remember to always check for seasoning throughout the cooking process. If you feel that its missing some salt or more shrimp seasoning, now is the time to add more. 

 Now, while the soup is cooling a little it's the perfect opportunity to make tortillas! No Salvadoran soup is complete without a side of hot tortillas. I like to use the Maseca corn tortilla mix. All you do is add water and you have your dough! Once you have the dough forming one giant ball start forming small tennis balls. Put a plastic bag on your counter and place your small tennis balls on the right side of the bag. Take the left side of the bag and fold it over the ball. It is comparable to making a book cover and your ball represents the pages inside the book. 
Then take a cutting board, plastic/wood, and press the board down. 

 Remove the board and once you lift the plastic bag you will have your round tortilla. 
Place your raw tortilla on a hot pan or on a pancake griddle. Flip after about 2 minutes and wait about another 2 minutes for the other side to cook. 

 Buen Provecho!!! =) 

Thursday, 29 September 2011

Jaime Oliver's Red Thai Curry

This month I have become absolutely obsessed with a new show on the Food Network, it is Jaime Oliver's Meals in Minutes. Throughout the years I have watched Jaime move from one show to the next, trying to inspire regular people to stop eating pre-packaged foods/take-out and opt for a healthy homemade alternative. Despite his efforts, convincing the regular joe to cook for 2 hours to put dinner on the table was not going to happen, at least not every night. His new show however promises to put a full-course tasty AND healthy meal on the table in 30 minutes. Watching him create mouthwatering dishes from appetizer to dessert inspired me to put one of his recipes to the test. Being a huge fan of Thai curries I was pumped to try his Red Thai Curry.


Despite being a huge fan of Thai cuisine I most definitely did not have the majority of the ingredients sitting in my pantry. Therefore I headed over to the local Asian grocery store to pick up ingredients such as kaffir lime leaves and lemon grass. All in all everything on the ingredient list cost about $30, which included 3 bags of shrimps :)  With all my ingredients in hand, I took Jamie's advice and laid everything out I was going to need. I plugged in the food processor, preheated the oven and had my pans at the ready. I looked at the clock and began cooking. I will admit I cheated. I not only used a rice cooker to make my fluffy rice but I also had no intention of making the papaya platter as I do not like papaya.  I also could not be bothered to make the cucumber salad. So did I think that I was going to have everything done in 30 minutes, absolutely.


I had the rice washed and cooking in 2 minutes and felt quite confident that I would be enjoying my Thai curry shortly.  I chucked the coriander, tomato paste, ginger, red pepper ( I forgot to purchase the roasted red peppers in oil), garlic, lime leaves and chili in the food processor. Jaime encourages viewers to taste the chili to determine the intensity of heat. Thank goodness I tried it. My one inch chili packed a punch, therefore I decided one was more than enough. Having never worked with lemon grass I was a little taken aback of its woody-bamboo like texture, but threw it in away.


I locked the food-processor lid in place and turned it on. Unfortunately for me, my food processor did not produce the miracle paste that Jamie's food processor produced.  Instead it made a horrible sound and the smell of metal began emanating from the machine. I tried to see what the problem was and wasted 20 mins trying to get it to blitz. I then got the bright idea to use my hand-held blender....another disaster. Then, realizing that it was too late to chop everything up manually as they were covered in each other's juices, I took out my cheese and meat grinder and thought that would do the trick. It grated the ginger and then everything else got stuck. So I started manually chopping. After making what looked more like a salsa than a paste, I added the olive oil, sesame oil and soy sauce. I  tried the concoction and was pleasantly surprised with how the flavours popped in my mouth.


After the food processor and the blender
I started by adding some of the paste to the raw shrimp and popped them in the oven, then placed the remainder of the paste in a pot and followed Jaime's instructions. Everything after the paste ordeal was coming together in a matter of minutes.  I pulled the shrimps out of the oven and got a bowl of rice and added the curry and shrimps to it. It was delicious. Granted the sauce was a little thinner than my personal preference but the flavour was definitely there. I will be making this recipe again and next time I either chop the paste manually the first time around or I get a new food processor.


Stress level: 3/5 (The food processor issue really threw me for a loop but after that was resolved, it was smooth sailing)

Tastiness: 3.5/5 (It was still lacking compared to the Thai Lamb Curry at the Bangkok Spoon)

Cooking Time: 45 mins (Granted without machine issues it could have been accomplished in 15-20 mins)

Overall rating: 4/5 (Definitely worth repeating)